
It is possible to start your lease with the information from your rental applications. Once your rental application is signed and accepted, it is possible to add the relevant information directly to your lease.
Click on “Create a new lease”, located in your “My Leases” dashboard. Fill out all the sections of your new lease.
Section A
- Landlord Information: enter your information
- Tenant Information: fill in your Tenant’s information
- A maximum of 4 tenants may be registered in the lease
- Enter the current address of the Tenant
- WARNING: e-mail is essential for the electronic signature request
Section B
- Fill in the information of the rental dwelling
- Address
- Accessories and dependencies
Section C
- Specify the term of the lease
Section D
- Enter the amount of the rent and the terms of payment
Section E
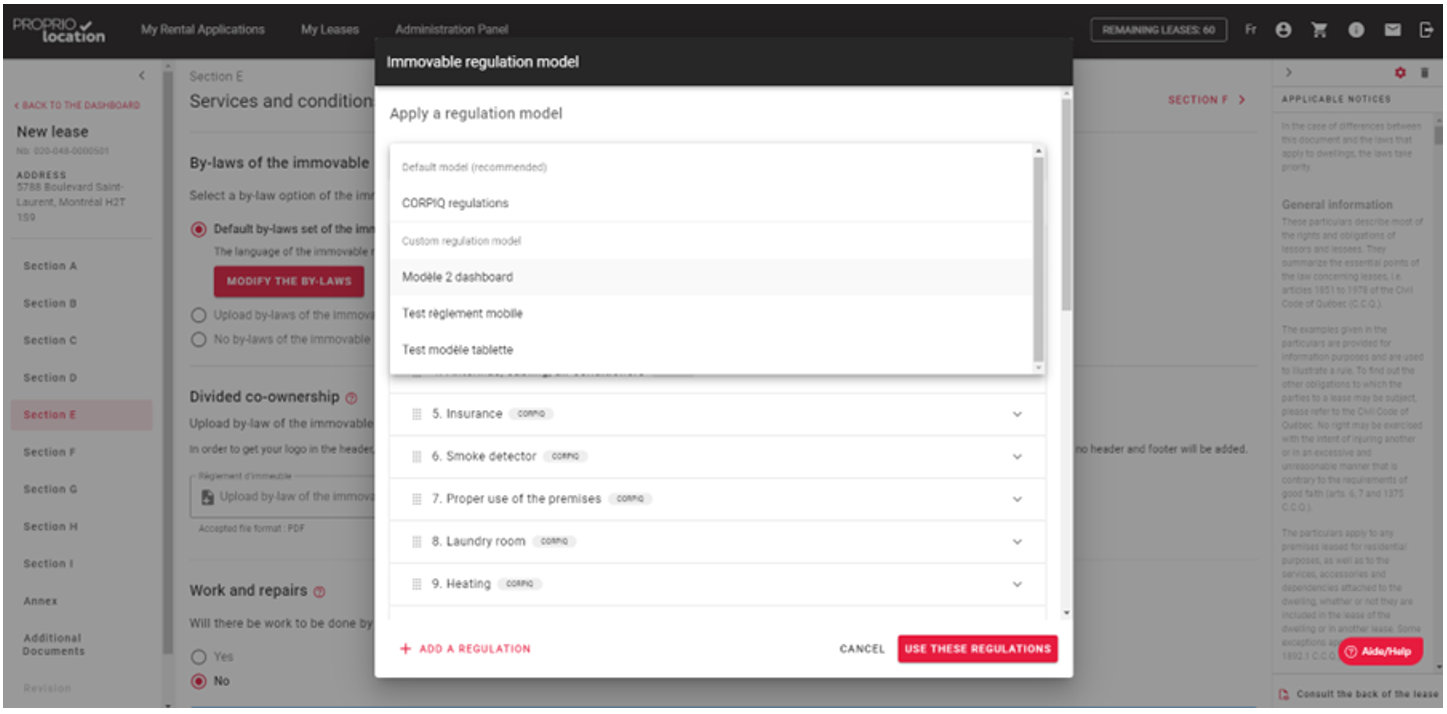
- Specify services and conditionsNOTE: It is possible to use the CORPIQ regulations model and deselect irrelevant clauses and easily add new clauses. It is also possible to upload your own regulations.
Section F
- Specify the details of a new construction or change of use
Section G
- Specify the lowest rent for the last 12 months
Section H
- Preparation for signature and Guarantor
Section I
- If necessary, enter the name of the spouse(s)
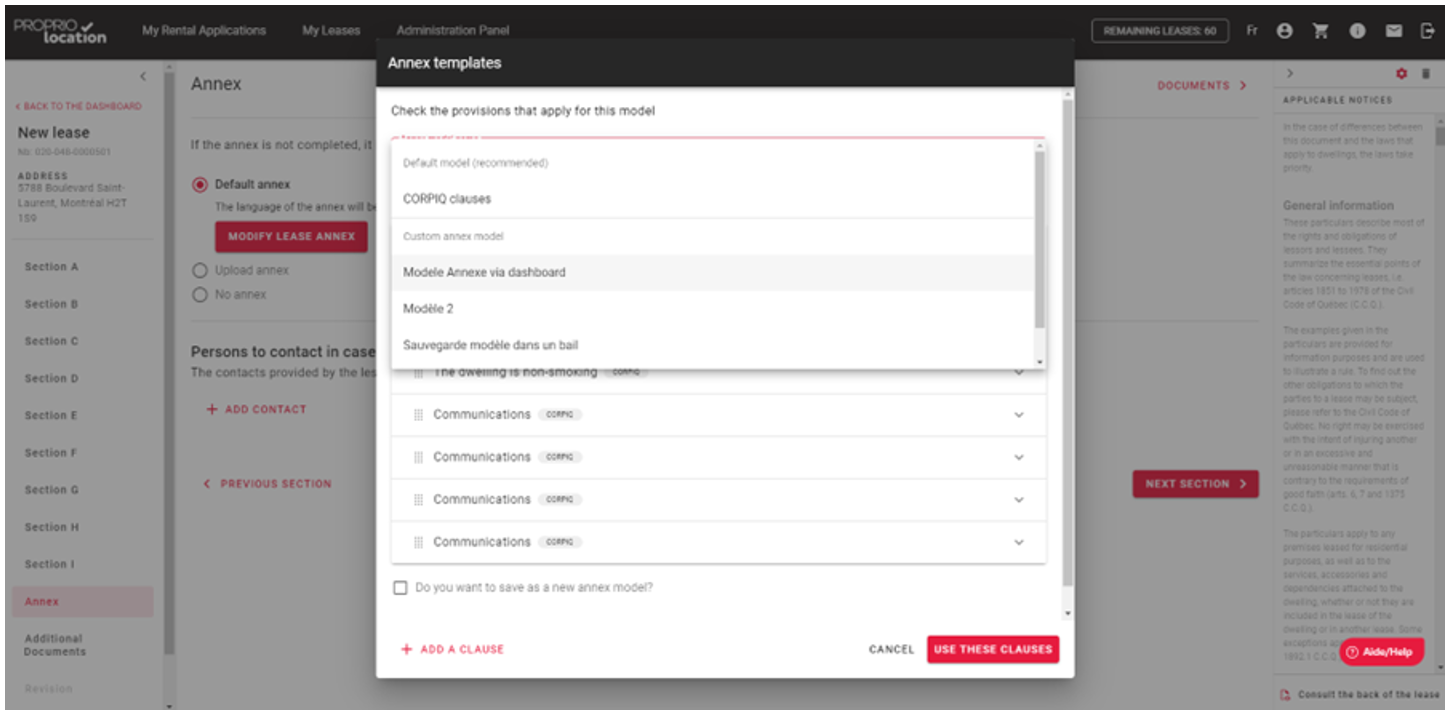
Annexe
- Complete the necessary elements of the annex
Additional documents
- Adding documents to the leaseWARNING the documents must be in pdf format.If necessary, obtain the required signatures on your documents before uploading them.
Revision
- Please review and ensure that all information is correct.WARNING this is your last chance to make changes.
- Confirm your acceptance of the terms of use
Production of the lease
- Check the availability of credits to generate the lease
- It is possible for you to top up your credits at this stageWARNING: Once generated it is no longer possible to make changes and no refund will be possible.
Have the lease signed
- There are two methods of signing the lease:
- The handwritten signature, once your lease is concluded, it is possible to print it and then obtain the signature(s)of the tenant(s).
- The electronic signature, to avoidhaving to go back and forth or travel, we give you the opportunity to sign it electronically. The process of signing digital documents with the Notarius’ solution is compliant and accepted by the Tribunal administratif du logement.
The final step is the production of the Lease. This stage produces the final lease with all signatures.
When a lease is created, it is saved automatically each time it is modified. It is therefore possible to return to your lease in progress at any time.
It is possible to delete a lease before it is generated. Use the small bin icon at the top right of the screen in the lease.
We have taken all measures to ensure compliance with the law at the time of the production and signing of your leases. Our official lease form is obtained directly and authorized by Publication Québec. The signature verified and certified by our partner Notarius ensures the legal reliability of the signature of your lease by meeting the highest standards in the industry.
When you fill out Section E of the lease, it is possible to select the model building regulations proposed by CORPIQ or to upload your own version. If you select the proposed model, you can make adjustments to the clauses provided (ex: remove the laundry clause). It is also possible to add your own clauses.
Yes, it is possible to upload the following documents:
• Building regulations
• Co-ownership regulations
• Other Annex(es)
• Other document(s)
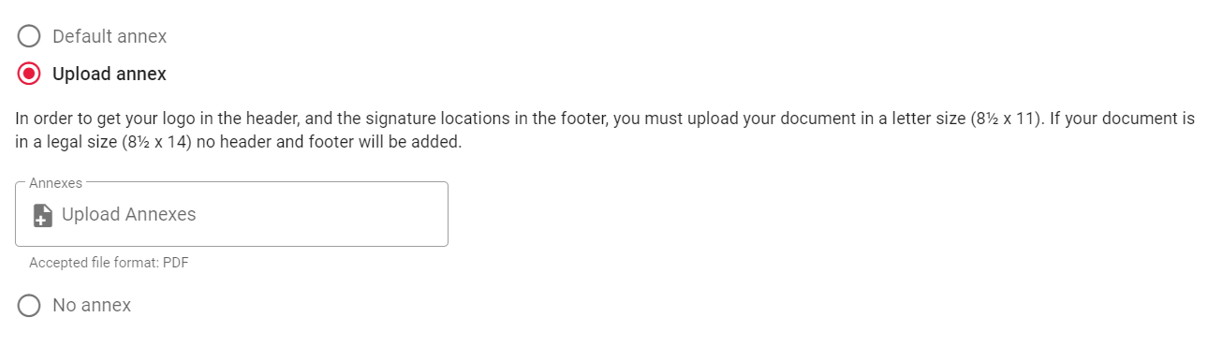
In order to get your logo in the header, and the signature locations in the footer, you must upload your document in a letter size (8½ x 11). If your document is in a legal size (8½ x 14) no header and footer with signature will be added.
Warning, it is not possible to upload an encrypted, electronically signed or password protected pdf file, it will not be recognized by our system.
NOTE: If necessary, obtain the required signatures on your documents before uploading them.
We accept PDF files (read-only, no Acroforms form allowed) up to 8MB per document.
If the document you want to upload is too large, we recommend that you reduce the size of it before uploading it.
Many tools exist on the market to reduce the size of your documents. You can use this online one I Love pdf for example.
When using ProprioLocation several e-mails are sent by the system. It is possible that the e-mails arrive in the junk mailbox. Please make sure to check the inbox, junk and other SPAM mailboxes.
A printed black and white lease will never be invalid; however, it is strongly recommended to print it in color. The lease will always be legal regardless of color, but the idea is to respect the intention of the lawmakers when parts of the lease have been designed in color and will not be as obvious in black and white.
If your lease has been generated, it will not be possible to change the email address on the lease; however, you will be able to change it for one or more signatories who had an email address at the time the lease was generated.
To do so, nothing could be easier:
1. Go to the lease management tool
2. Press the button with the pencil icon on the left next to the signatories’ email addresses
3. Modify the concerned email address
4. Press the paper airplane icon to send the lease to the new email address
5. That’s it, the signatory will receive the lease at his or her new email address
A lease is a contract between several parties. In order for it to be valid, it must be the same for all signatories.
Therefore, when reviewing your lease, we ask you to choose the language in which the lease will be generated.
Your tenant(s) will therefore all receive the lease in the language you have chosen beforehand.
You must have an Internet connection to properly save the information on a lease; otherwise, we will not be able to save the data for the production and sending of your lease.
In order to be in good standing with Publications Québec regarding the use of their model and thus be in legality with the Tribunal administratif du logement, we must respect the spaces provided for this purpose on the lease.
To facilitate the filling process, we highlight the number of possible characters and some tips to have an optimal display on the lease:

Take advantage of the time when you revise your lease to check that all your texts appear correctly. If this is not the case, you have probably exceeded the number of characters.
To avoid this situation, we recommend that you adapt your content to be as short and precise as possible.
If you want to save some space, some contractions can be allowed, for example: two –> 2.
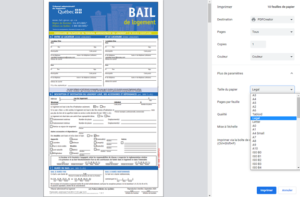
”The Tribunal administratif du logement lease form is mandatory since September 1, 1996. It must be used for all new leases for rooms, apartments, condominiums, houses, etc.”
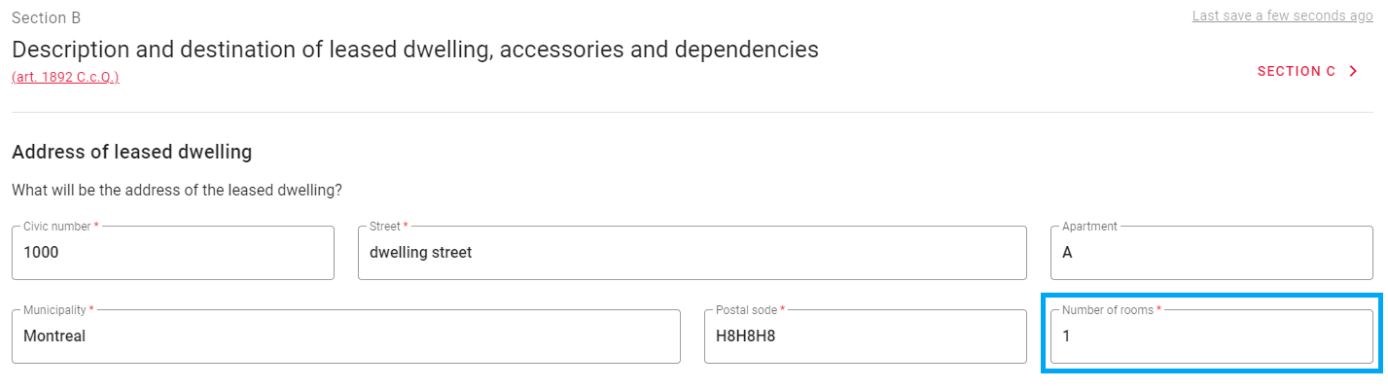
When you only want to rent a room to one person, nothing could be easier.
When filling out the lease in section B: and within the address of the leased dwelling, simply write “1” for the number of rooms:
Absolutely, you can use the Electronic Lease solution without any problem. If you are not yet registered click here.
The advantage of using CORPIQ’s rental application and pre-rental screening will save you more time in transcribing the information when creating your electronic lease.
In fact, you can launch an electronic lease from the CORPIQ rental application which will allow you to re-enter only the information specific to the lease that you could not fill in the rental application such as inclusions in the dwelling, building rules, annexes…
By being a member of CORPIQ, you can take advantage of preferential rates when purchasing credits for your electronic leases:
Unit price at $6.50 instead of $10.20
You are not a member of CORPIQ yet? Join now to take advantage of all our benefits! Click here to discover all the benefits of being a member of CORPIQ.
Yes, you can use the Electronic Lease to rent low-income housing. An electronic lease is a contract between you and the tenants. We even recommend that you always create a lease to protect yourself from potential problems with your tenant(s), especially if you must go to the Tribunal administratif du logement.
Yes of course, when you purchase a credit for the Electronic Lease it includes the purchase of the lease from Publication Quebec as well as the digital signature via our partner Notarius.
It is important to consider the charter of rights and freedoms and other laws of your jurisdiction when formulating your settlement clauses. You can consult the charter by clicking here.
Before generating your lease, we recommend that you contact your tenant(s) to discuss any final points that you may not have been able to discuss with him/her beforehand.
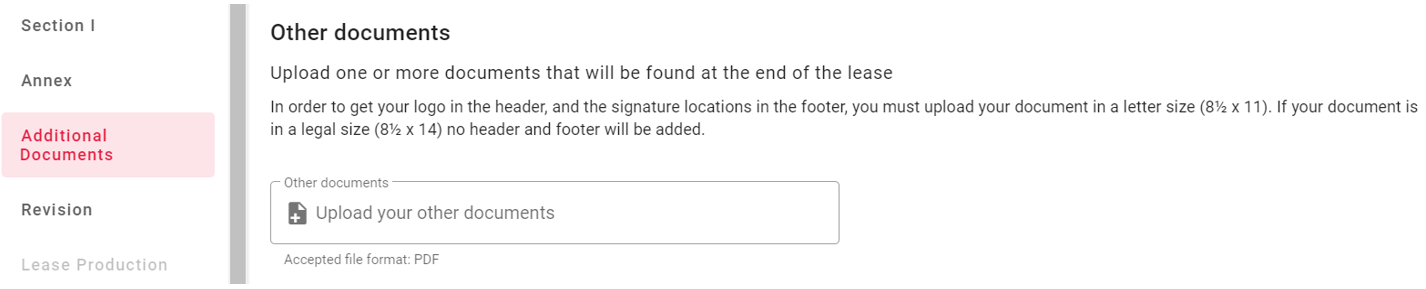
You can include a pre-authorized payment authorization form or other documents that you wish to attach in the “Additional documents” section under “Other documents”:
As soon as you start an electronic lease, it is kept on our servers, regardless of its status (in production, signature requests to be sent, waiting for signatures, to be concluded, concluded).
Electronic leases are always kept on our servers unless you decide to delete it by your own action.
Yes, you can. You can add the animal regulations in the “Additional Documents” section. Then add your animal regulations in “Other Regulations”. We recommend that you upload the PDF document in letter size (8½ x 11), so that you get your logo in the header, and signature locations in the footer.
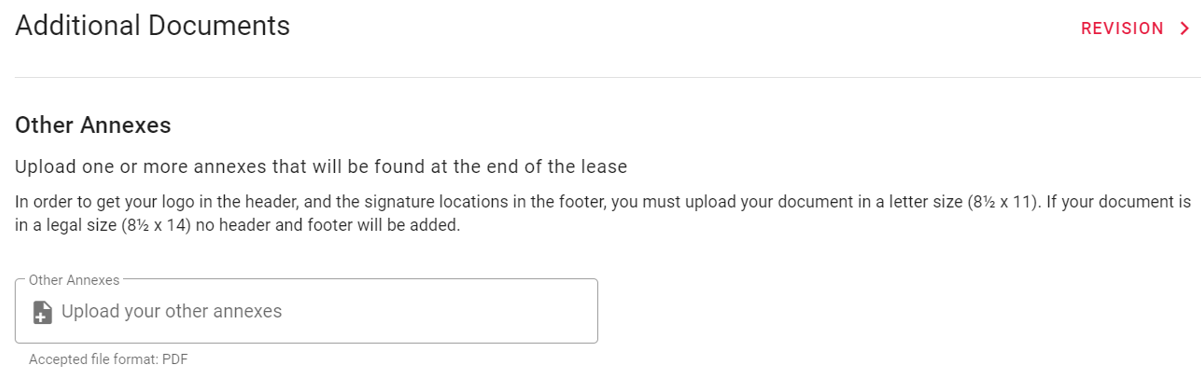
Note: If your document is legal size (8½ x 14) no headers or footers will be added.
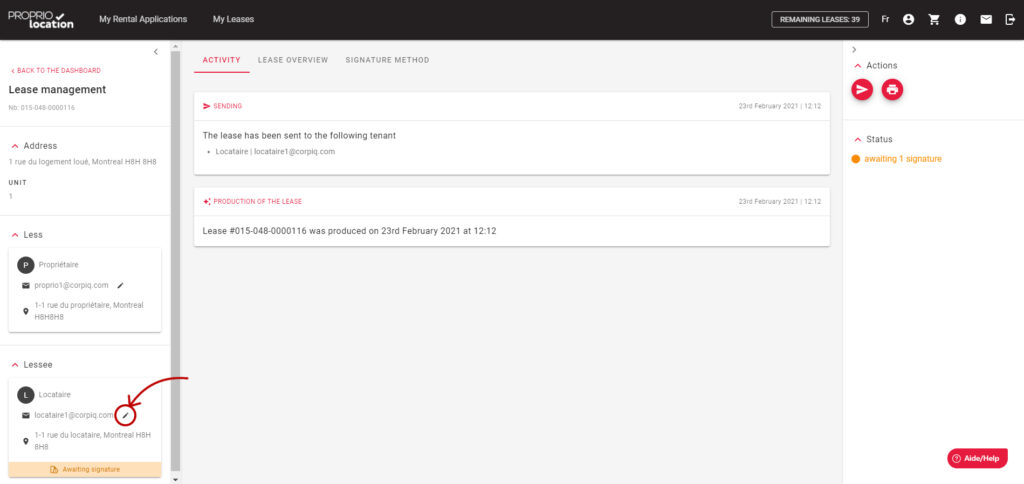
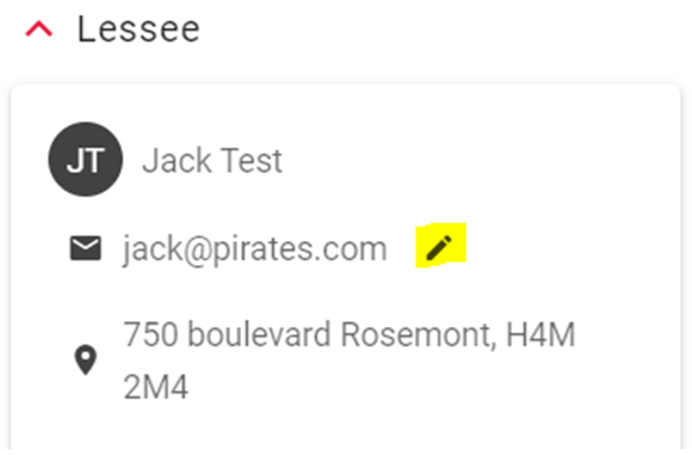
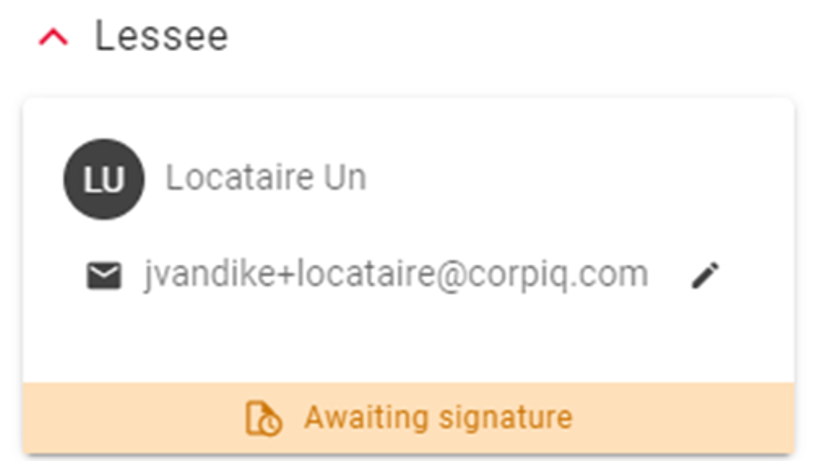
It can happen that you make a mistake in the writing of an email address when you generate your lease, which blocks you from sending it for signature.
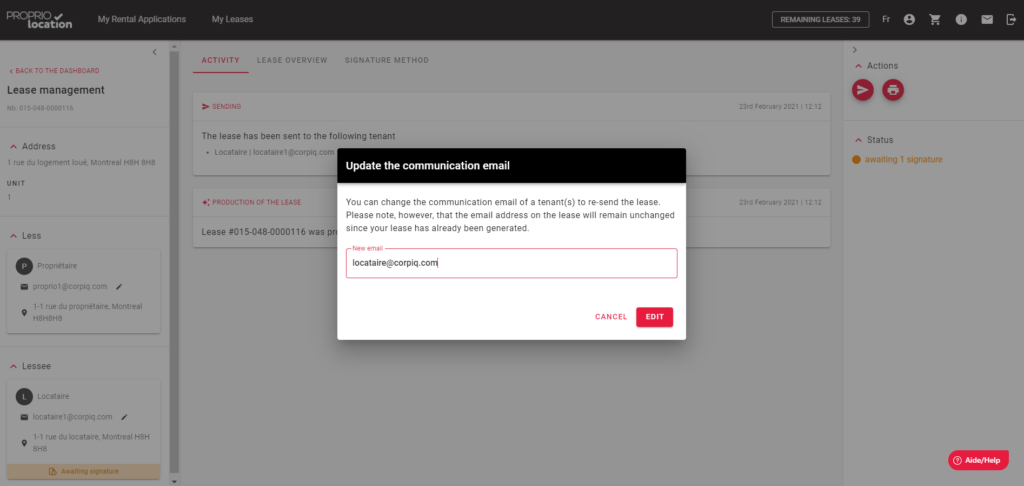
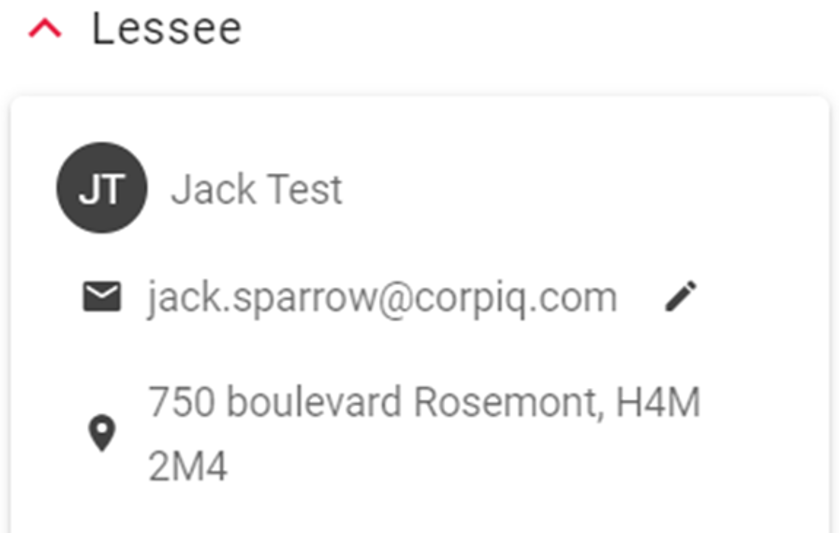
To remedy this problem, you can change the communication address for sending your lease by going to your lease’s dashboard (left pane) and then using the pencil icon next to the email you wish to change.
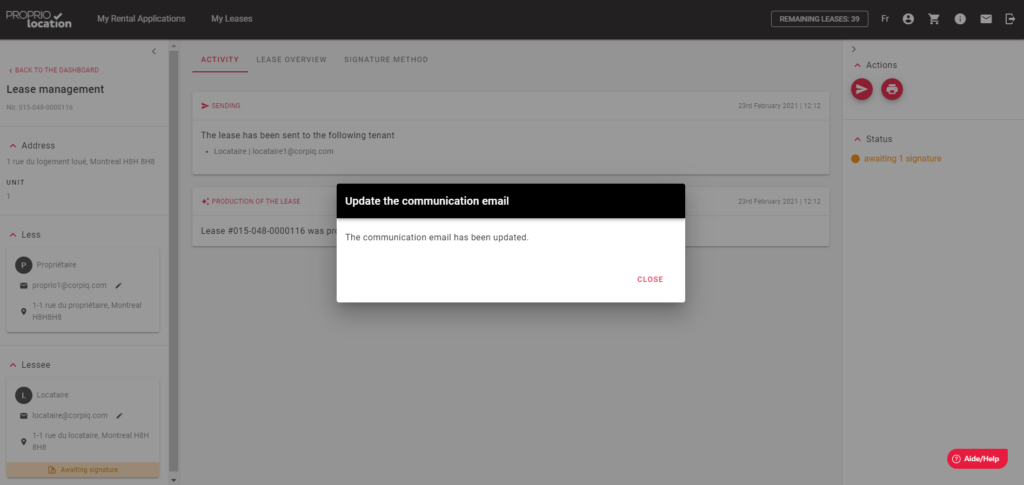
A pop up window will open to modify the communication email:
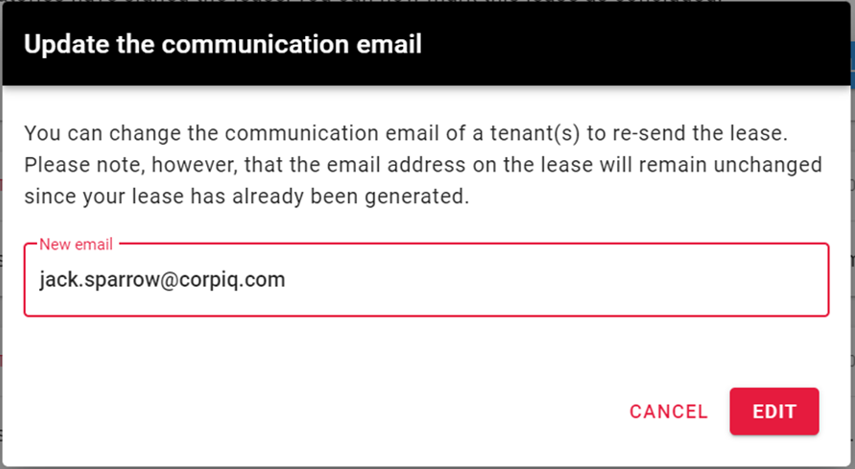
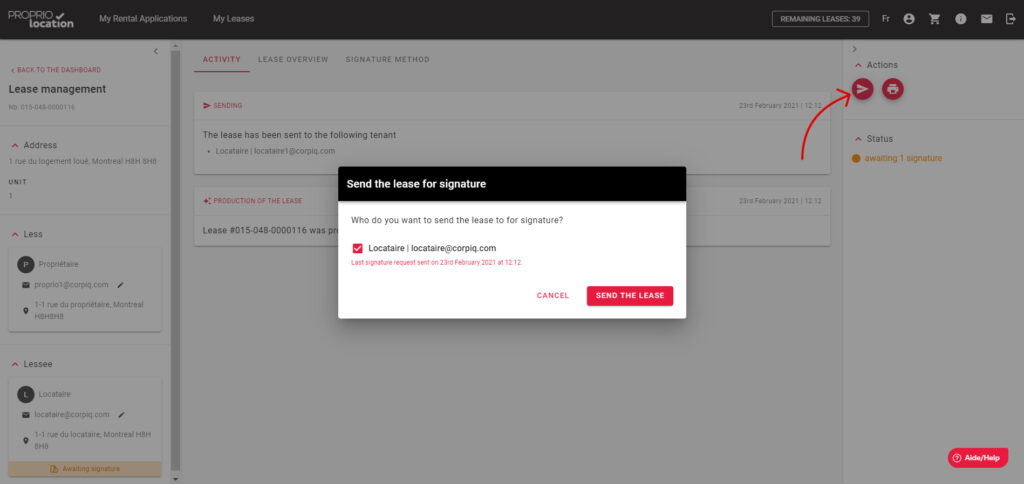
You will then be able to send your lease to the modified email address:
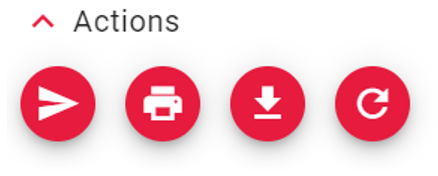
Simply click on the paper airplane icon (top right panel) to send or resend the lease:
Be careful, this action only modifies the communication email address to send the lease. The address initially put in the lease will always remain the same since the lease is a contract, once produced, it cannot be modified.
You can put any other conditions, restrictions, and services related to your dwelling.
In your lease revision, if you see the sentence “There is an annex that is an integral part of this lease and forms an indivisible whole with it”, it is simply that there is an annex attached to your lease.
What is considered an annex: adding an annex in the Annex section; another annex in the Supplemental Document section; or if you have added an endorser in Section H (which is also part of the annex).
Please find below the full explanation of the temporality statuses of a lease application:
In Progress:
– Your request is in the process of being created, if after 2 days your request is still in progress, it will be automatically classified as an expired rental request. If you wish to restore this pending request, you will be able to restore it via the expired tab for 14 days.
– If you decide to delete a pending request it will automatically go into your request history.
Signed:
– You will find all your applications that have been signed where you can view the rental application in PDF with all the information.
– You will be able to launch a credit inquiry during a period of 14 days after the signature of the rental application. After this 14-day period, your rental application will automatically be filed as an expired rental application.
– If you decide to delete a signed application, it will automatically be placed in your application history.
Expired:
– Here you will find all the applications that have expired, after 14 days each application will be filed in the history.
– Please note, for requests that were in progress or signed, you will be able to restore them for a short period of time if needed.
– If you decide to delete an expired request, it will automatically be placed in your request history.
History:
– You will find your old rental requests without any sensitive data for confidentiality reasons, and you will no longer be able to consult the PDF of the rental request.
– You will only be able to see the address of the apartment, the name of the applicant, the email address of the applicant and when the rental application was created.
– You have the option to permanently delete a rental application and it will disappear from your history.
It is very rare that future tenants and endorsers do not receive our emails!
Ask them to make sure that they have checked their junk mail.
You also have the option of resending a copy of the lease to that same email address, but you can also change the recipient’s communication email address by going directly to your lease dashboard.
To send a copy, simply click on the paper airplane icon at the top right of the screen:
To change the communication email address, go to the right side of the lease and click on the pencil icon. Follow the instructions and resend the lease to this new communication address:
You are used to putting the same information from one lease to another (landlord’s address, or the conditions of the payment method, etc.), from a building regulation or in an annex. Don’t waste time starting from scratch with the creation of templates. Know that you can modify your templates as you wish!
To create a new templates, go to the tab ” My Leases ” then click on the sub-tab ” Templates “, to finish click on the button ” + ” on the right:

A pop-up window will appear where you start by naming your lease template:
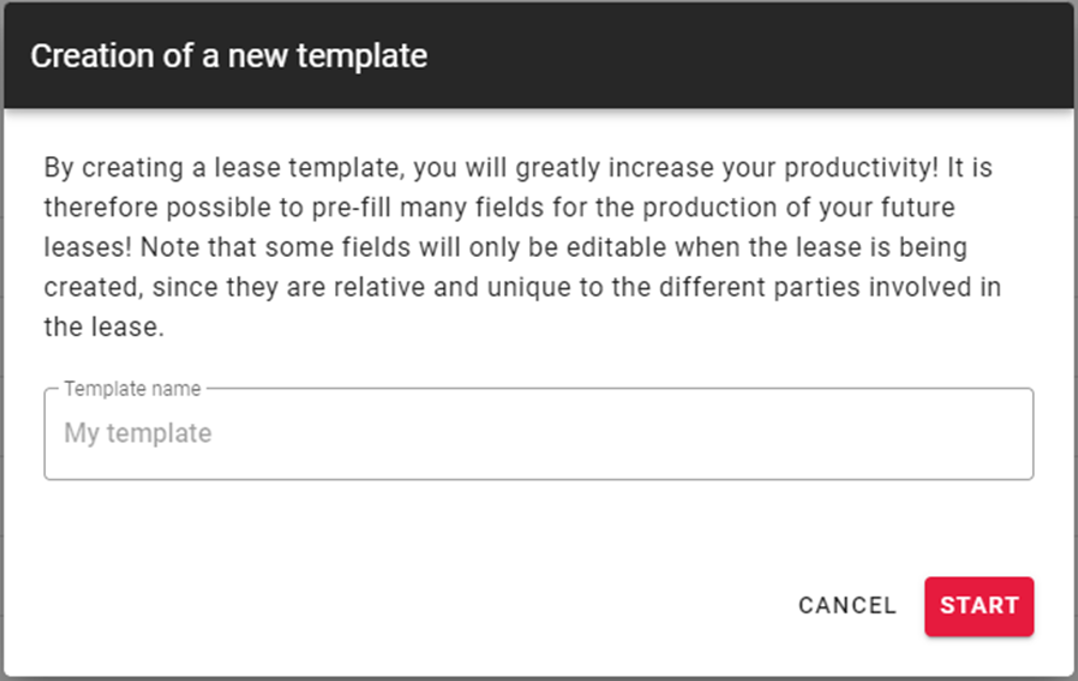
Once you have named your template, fill in the different information for the sections you want to appear in your template. The information is saved as you go on.
For your information, sections with information that changes from one lease to the next will be grayed out to avoid confusion.
You can go to the template review to verify one last time that the information in your template is correct.
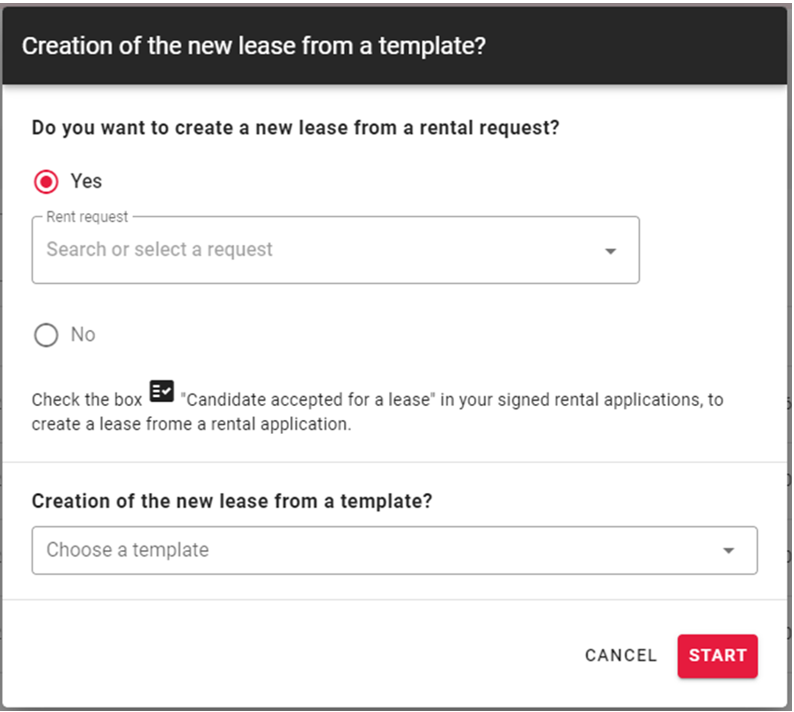
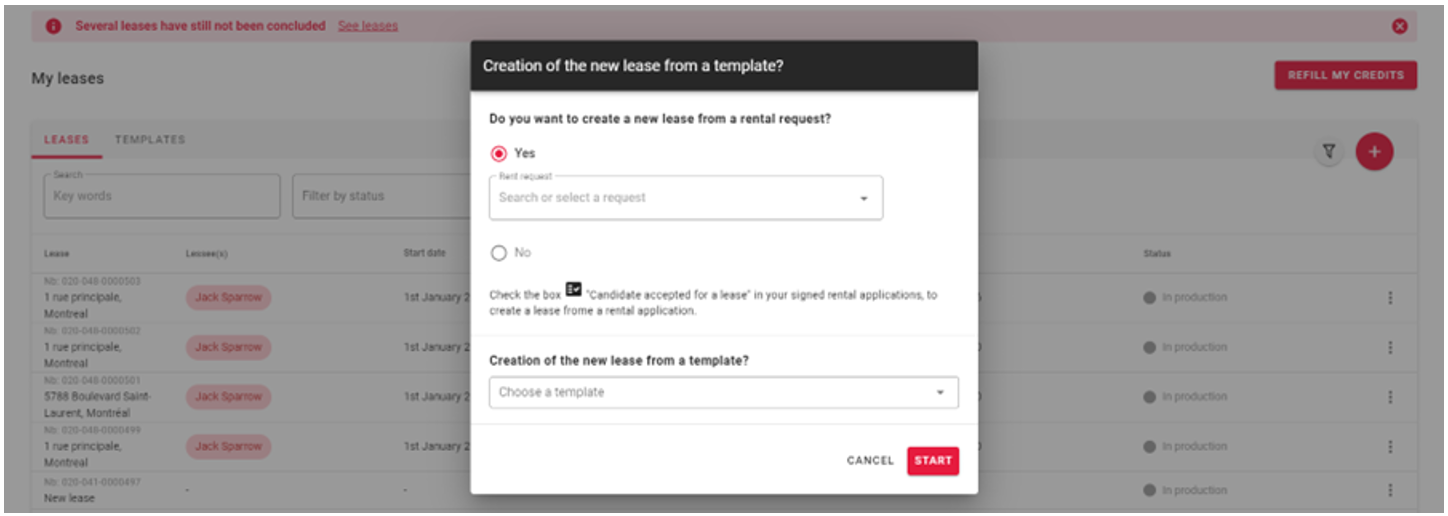
Once you’ve checked, you can return to the “My Leases” tab and start using your template by creating a new lease and selecting the template you want:
Just like the lease templates, save time with the creation of new templates directly in your “My Leases” tab, then go to the bottom of the page in the “My Templates” section.
Depending on whether you want to create a building regulations or annex template, you would simply select the “Annex” or “Building regulations” sub-tab and then press the “+” button on the right to start a new template for one of these templates:

For the creation of a building regulations, you can even start from the CORPIQ model and then add your own clauses freely instead of starting from scratch!
To modify one of your templates, nothing could be easier. Go to the “My leases” tab and select the template you wish to modify. Click on the 3 small dots to modify it.
Example with the modification of a lease template:

For the regulations and annex templates, it is exactly the same principle.
Congratulations! You’ve created a new template, but how do you use it?
You have two options! The first is to click on the three little dots of the template you want to use, then click on “Create a lease from a template”:

The second possibility is to click directly on the “+” button of “Leases”, when the pop-up window appears. You will just have to choose the template you want to use to start a new lease:
To use a template for annex or building regulations, it is very simple.
For the building regulations, go to section E then click on the button “Modify Regulations” then select the customized template you want:
For the annexes, it is the same principle. Go to the “Annexes” section and click on “Edit Annexes”. Then, select the annex template you want to use and that’s it!
Want to do a little cleaning? There are several options available to you.
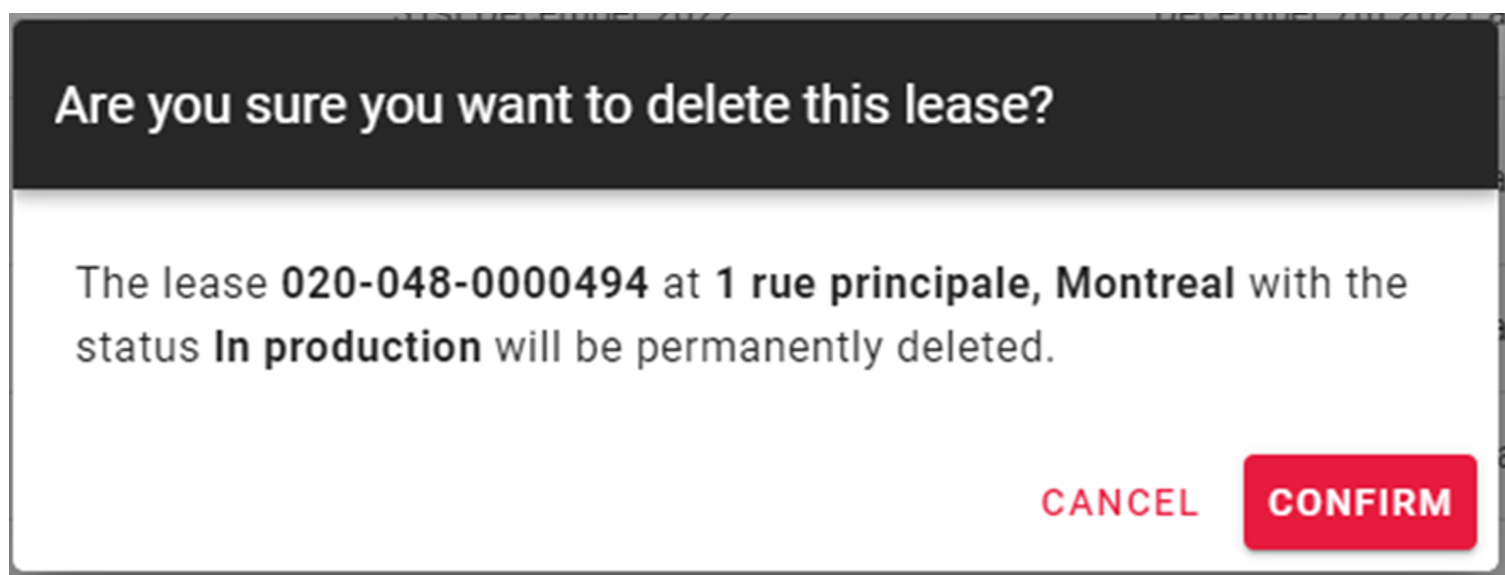
If you are inside a lease that is being created, use the trash can icon located at the top right of the screen in the lease:

Another possibility when you are in the “My leases” tab. In the right section of each lease in your list you will see 3 small dots. By clicking these 3 dots you will have the possibility to delete the lease, whatever its status:

Once you press “delete”, you will get a confirmation message for the deletion of your desired lease:
You should know that it is the same principle to delete a lease, regulation, or annex templates.
There are several ways to easily search for a lease on the app.
Using the search bar, you can search by lease ID using tenant names or by the address of the dwelling.

Also, you have the possibility to filter your leases according to their status (lease in production, awaiting signature, signature request sent, to be concluded, and concluded).
You can add your personal or commercial logo to your profile, which will be included in your rental application as well as in your building regulations, condominium rules, annexes, and other documents during the configuration of your lease.
The recommended size for your logo is: 120 x 80 pixels
For the logo to appear on your documents, make sure that they are 8½ x 11 in size when imported.
Example in the lease application (top right):
![]()
Example for the building regulations (top left):
![]()
Example for the annex to the lease (top left):
![]()
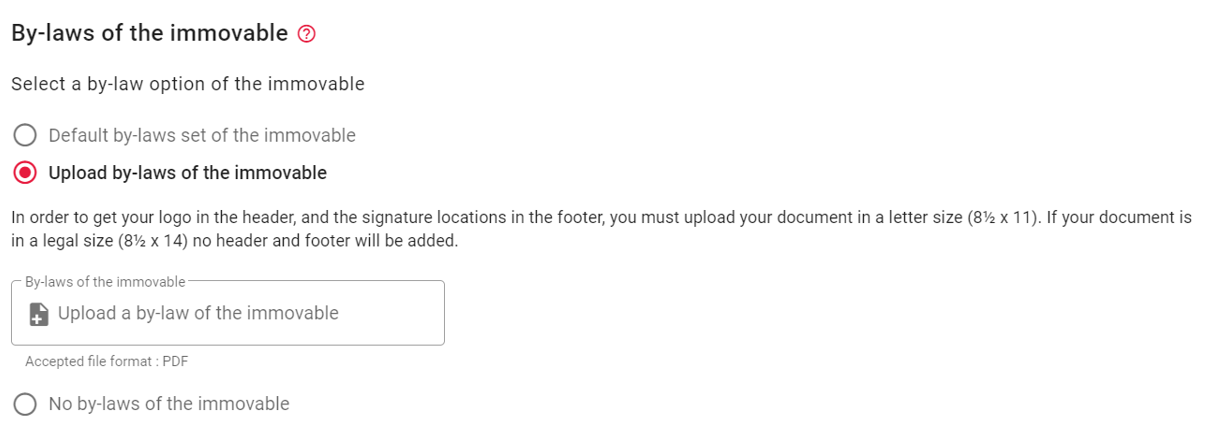
When filling out your lease, we give you the possibility to import your own building regulations (section E) and annexes (annex section) in 8½ x 11. At the time of the revision of your lease, you will see that we automatically add a space to allow your future tenants to electronically sign these documents at the same time as the lease which will allow you to save time by avoiding the roundtrips with your future tenants.
Example for the building regulations:
Example for the annex:
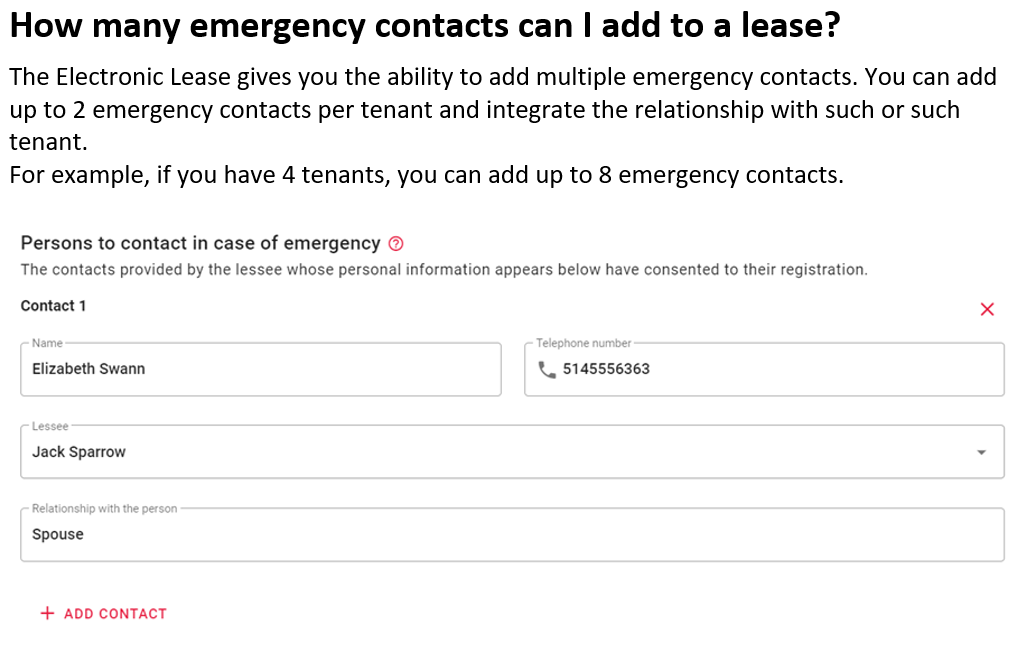
The Electronic Lease gives you the ability to add multiple emergency contacts. You can add up to 2 emergency contacts per tenant and integrate the relationship with such or such tenant.
For example, if you have 4 tenants, you can add up to 8 emergency contacts.
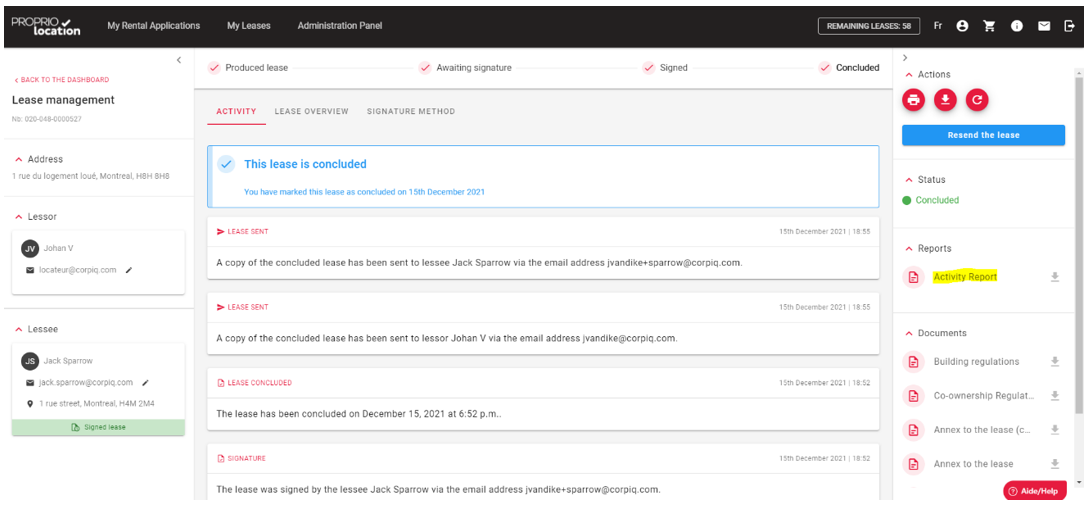
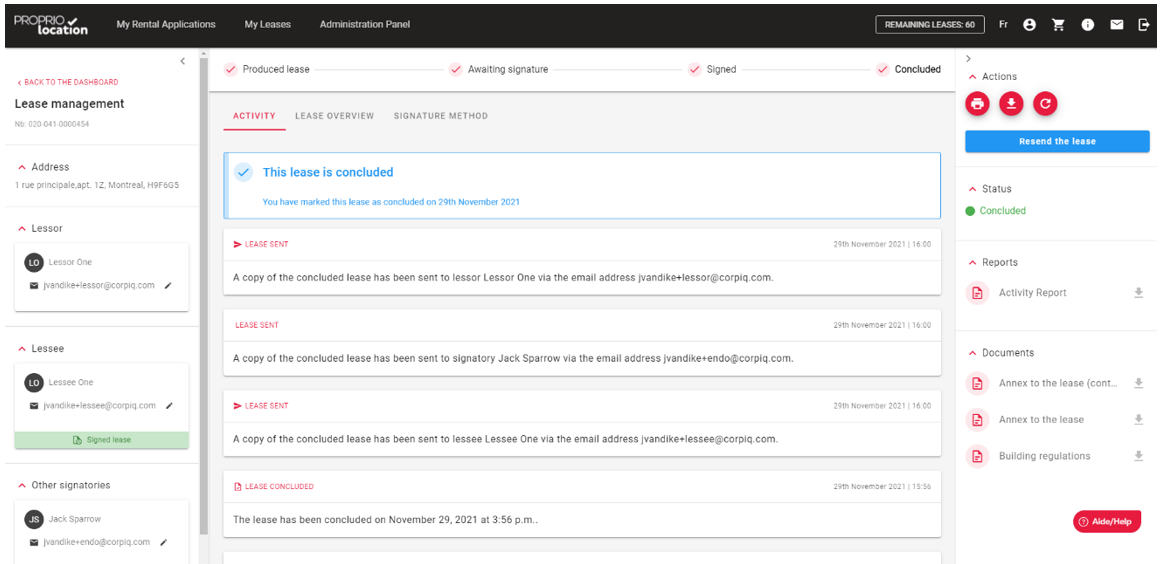
You now have the option of having a downloadable PDF Activity Report to list all the activities that have taken place from the time the lease was submitted to the time it was finally signed.
You can find it in the right pane when you are in the dashboard of a lease in the Reports section.
Once the lease is signed, you can send the signed lease to a third-party contact. To do so, click on the blue “Resend Lease” button in the upper right corner:
Once the pop-up window appears, press on ”Add a recipient” :
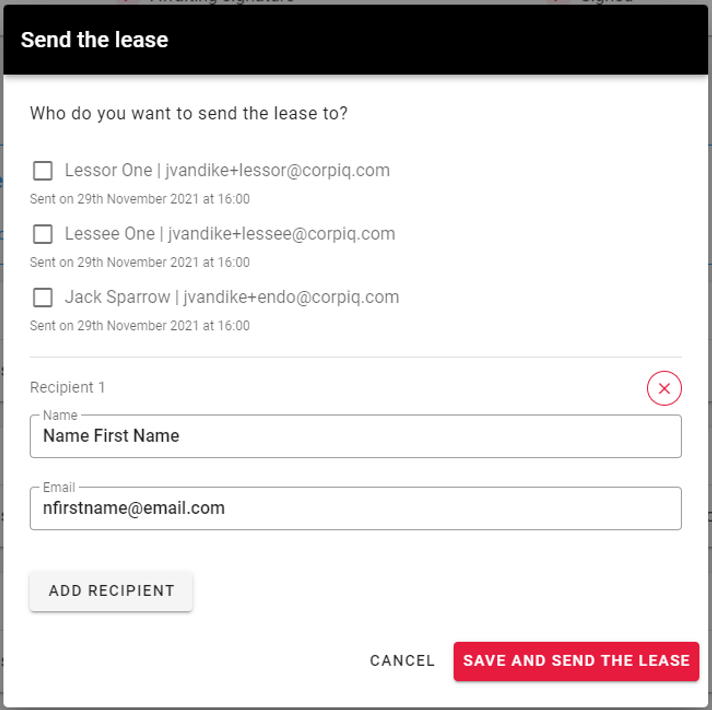
Enter the recipient’s full name and email address and click on “Save and Send Lease”. If you want to take the opportunity to resend the lease to existing recipients, you simply need to check the existing contact(s) you wish to resend it to.
Every time there is activity on a lease, you will receive an email to inform you.
Also, when you are in the “My Leases” tab on the app, you may receive alerts like this:

Indeed, after a period, when your leases are still in production, when signatories have still not signed, when leases have not been concluded, you can see an alert displayed to help you optimize your lease management.
Whether it is the building regulations, condominium rules, annexes, other schedules, and documents; When you upload any of your documents in letter size (8½ x 11) your logo in the header and the signature locations in the footer will appear.
The signatures on these documents will be visible once the lease is finalized, so you will see the signatures on these attachments when you receive the copy of the lease.
CAUTION: If your document is legal size (8½ x 14) no headers or footers will be added. Therefore, you will not have the chance to take advantage of the signatures on the attached document.
To respect the format of the lease by Publication Quebec, a user can add at most on the lease:
– 2 landlords
– 1 landlord representative
– 4 tenants
– 2 endorsers
In this section you can add for example: Manual or instruction guide…
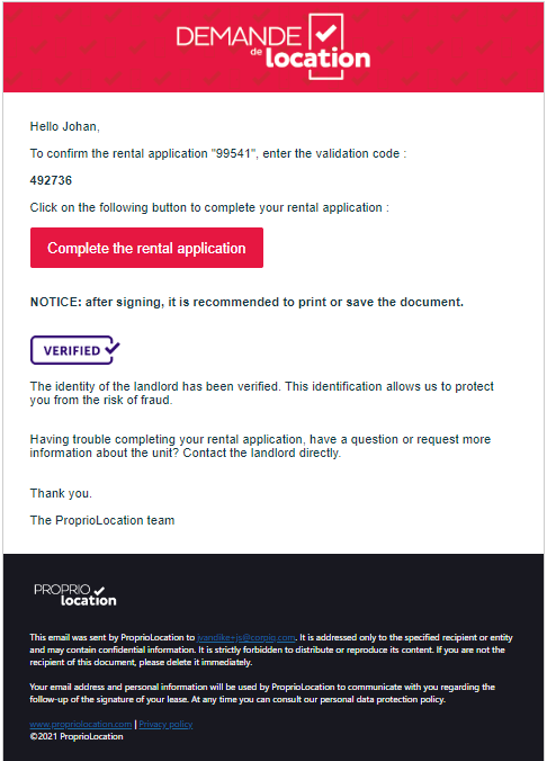
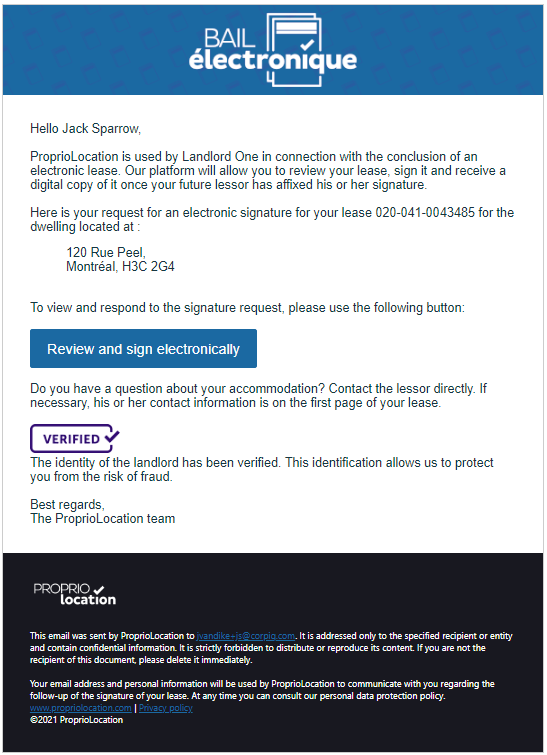
The Verified Landlord mention will be visible at different places in the consultation and signature process of an electronic lease. Indeed, this is a significant element of reassurance for future tenants.
Since we verify the identity of users through ProprioEnquête, why not let future tenants benefit from this information when a Landlord/Manager uses ProprioEnquête and ProprioLocation.
Below are the places where tenants can see this information:
- If you are a user of our rental application, the prospective tenant will see this information when you ask them to complete the rental application by email:
- Lease Review and Signing Email:
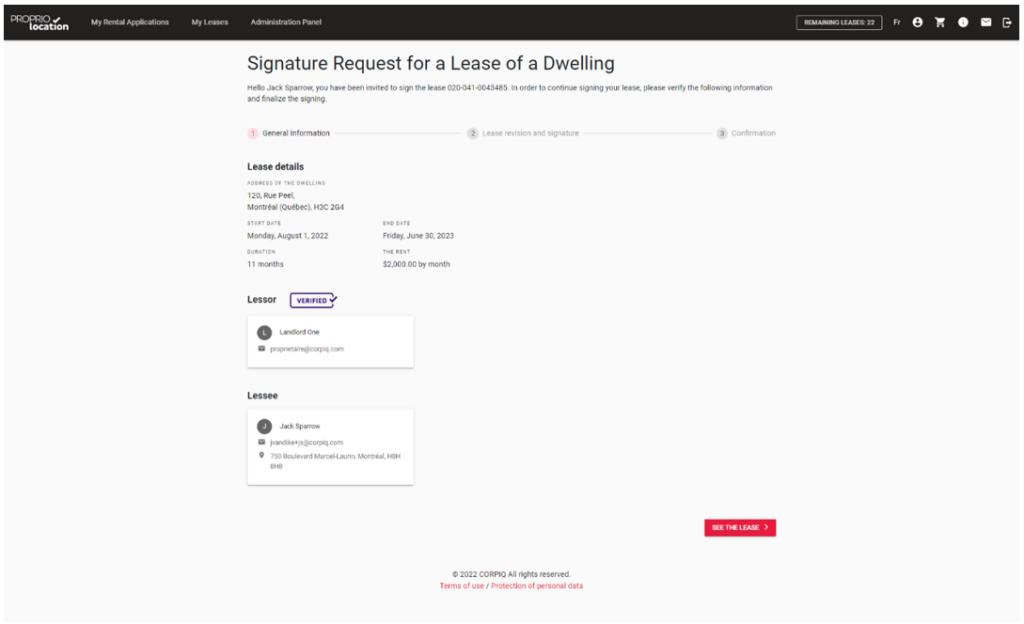
- In Step 1 to sign the lease:
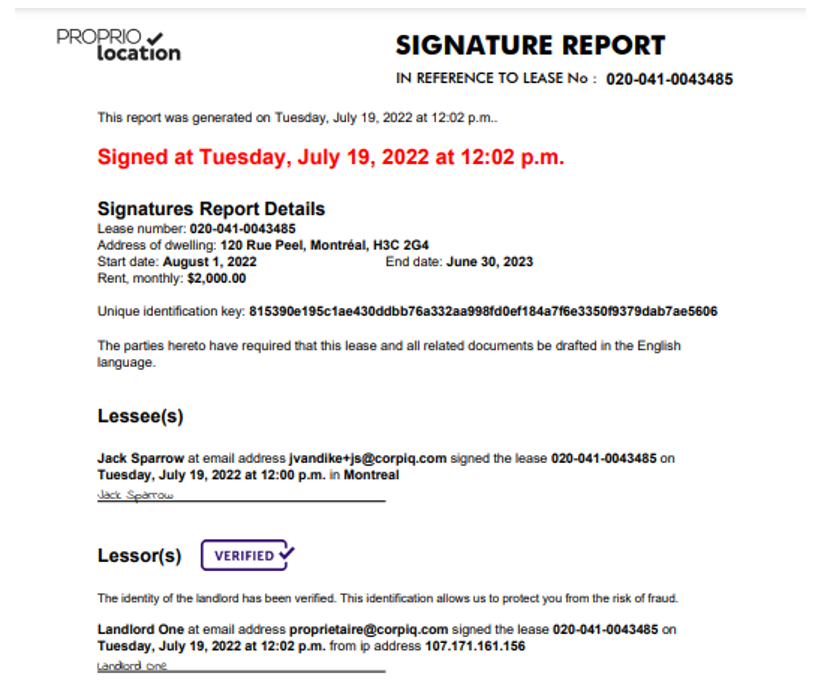
- In the signature report:
For your information or as a reminder, if you use Kangalou, people will also be able to find the verified label in the contact section of a listing.
You are not yet a member of CORPIQ? Join now.
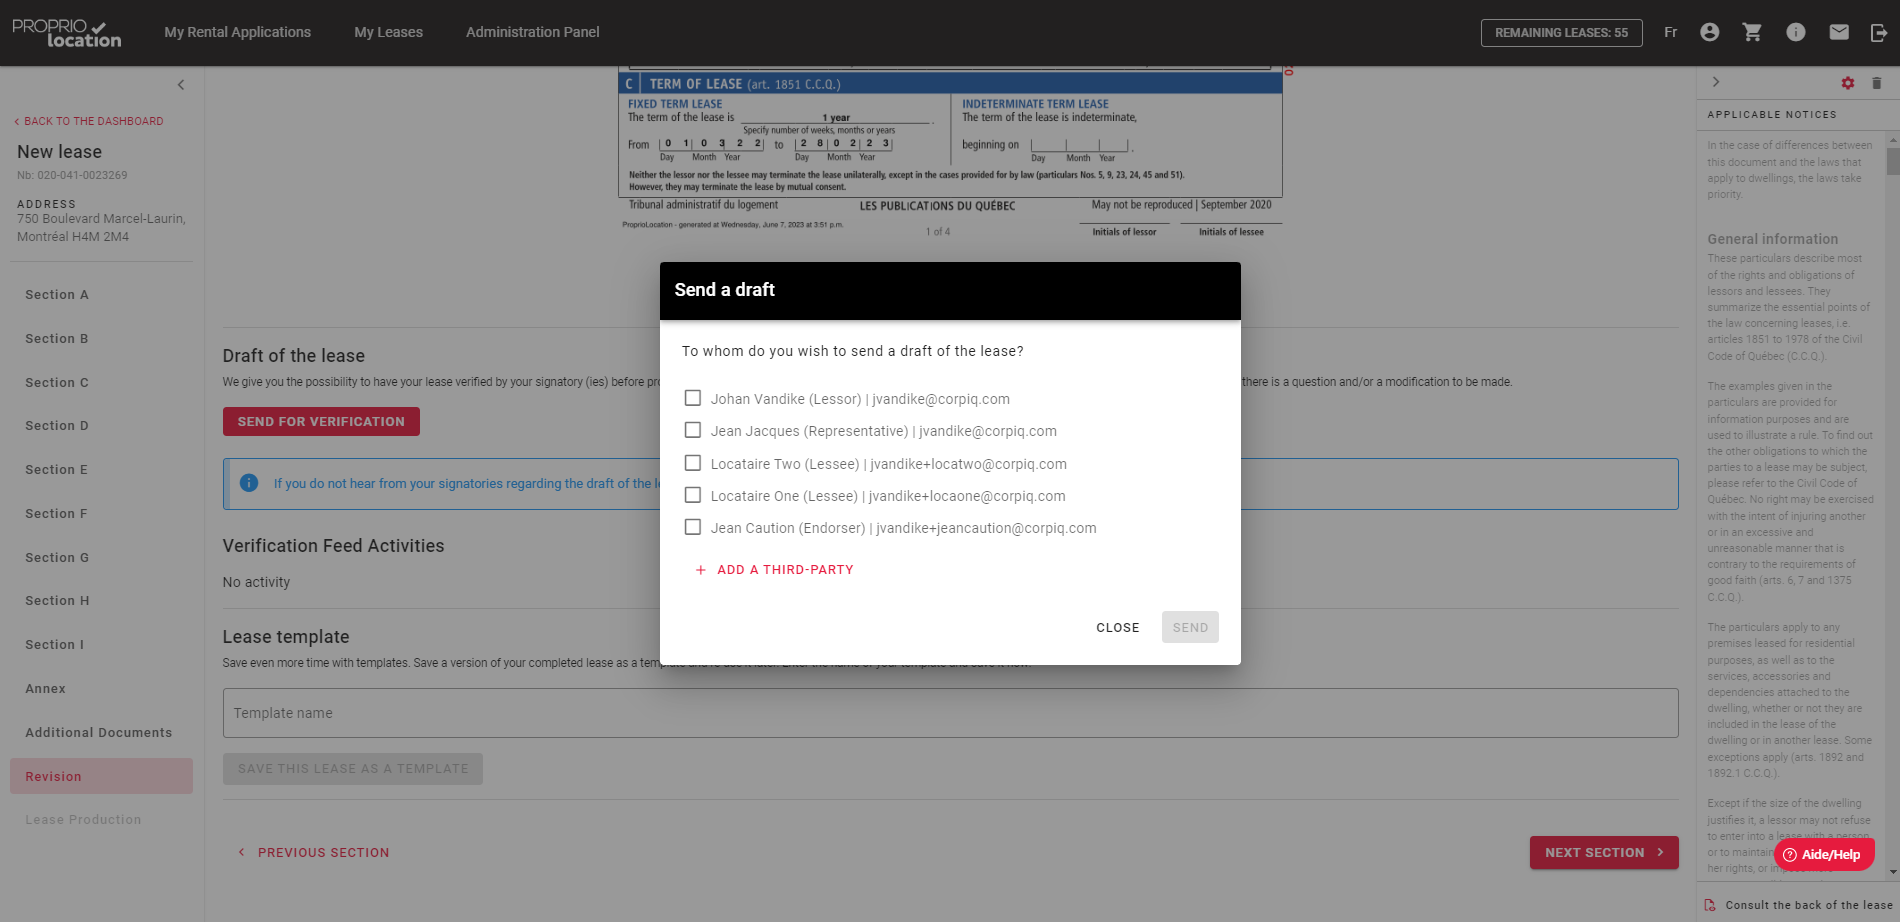
Once in the Lease Review section, click on the Send for verification button:
Then click on the button ”add a third party contact”, once the full name and email address added it will then send the draft lease to this contact for verification.
Once you have sent the lease for signature, the signatories will receive an e-mail (in the language in which you generated the lease). This will allow them to review the entire lease before signing.
Below is an example of the signature process for signatories:
Step 1 – Receive e-mail

Step 2 – After clicking on “Review and sign electronically”, the signatories will enter the lease review process, starting with the general lease information, followed by the review of each section. Once they’ve gone through all the pages, they can sign the lease by pressing the “Sign lease” button. Once the lease has been signed, the signatories can download their signature report if they wish via the interface (they will also receive an e-mail to this effect).


Once the signatory part has been signed, you will receive an e-mail to alert you.

Only once all the tenants and endorsers have signed their part can you conclude the lease.
Purchase of credits and user fees
For generating an electronic lease, the regular price is $10.20* / lease
If you are a CORPIQ member, you get a 40% discount on the regular price.
*Included in the price
2.99 for the lease form required by the Tribunal administratif du logement (TAL);
+ TAL license fee for the copyright on each lease;
+ Notarius electronic signature affixed to each lease signed electronically;
+ System fees (hosting, storage and maintenance);
+ Service fees (technical support, development, and improvements);
+ Legal expertise for CORPIQ’s exclusive documents (Annex, Building Regulations) and other expert advice;
+ Transaction fees (credit cards and financial fees).
Cost distribution:

Mandatory Fees
Unfortunately, due to the requirements of the Tribunal administratif du logement (TAL) regarding the resale of leases, it is impossible for us to offer you a lower selling price. The TAL sells us each lease at a fixed price of 2.99$ even though it is produced electronically. In addition, we are charged a copyright fee on each lease produced. Added to the total price are the Notarius electronic signature fees, the transaction fees (credit cards and financial fees), the system fees (hosting, storage), the fees for maintaining the service (development, technical support and putting it on line) in addition to the legal expertise fees for the production of the exclusive documents of the CORPIQ (Schedules and Building Regulations).
When producing a lease, it is possible to purchase credits for the creation of the lease. The “shopping cart” icon at the top of the screen also allows you to access the credit purchase page at any time.
Check the ProprioLocation website for current offers.
Credits purchased do not have an expiry date.
Credits can be refunded. Please make your request in writing to [email protected] with the details of your request and a copy of your invoice. Please allow 48 to 72 hours for your refund to be processed.
In your profile, you will find a section to purchase leases and view your purchase history.
Yes, the fees are the same when producing a paper lease or an electronic signature.
Lease status and electronic signature
In the dashboard it is possible to follow the process of tenant signatures in real-time. The different statuses of a lease can be: in production, awaiting signature, signed, to be concluded, concluded.
Once signed by the tenants you will have to conclude the lease in order to sign it and produce the final version.
Keep in mind that Article 1895 of the Civil Code of Québec recalls that “The lessor is required, within 10 days of the conclusion of the lease, to give a copy of the lease to the lessee”.
1. In production: a lease in production
2. Awaiting X signature(s): a lease has been produced and is awaiting signature(s)
3. Signed: the lease has been signed by all parties except you (tenant and endorser)
4. To be concluded: the lease requires your attention in order to produce the final version
5. Concluded: the lease is produced and finalized
An electronic signature guarantees the origin, integrity and authenticity of an electronic document and guarantees the acceptance of the text it contains by proving that you are the person who affixed the signature. In addition, it ensures the integrity of the document, i.e. it certifies that the document has not been altered since it was signed. It also reinforces the durability of the document by ensuring that it remains valid for years to come.
Yes, it is possible to produce a lease and print it out to collect handwritten signatures. The lease should be printed in color and on legal paper size (8½ x 14).
Yes, an email is sent following a tenant’s signature and an email is sent when all tenants have signed.
There is no time limit for the tenant(s) and endorser(s) to sign their part of the lease.
If the signatures are late in being returned to you, we advise you to follow up and contact the missing signatories directly.
If necessary, you can send them a copy of the lease to be signed by email.
Do you want to print a copy of your lease, but want to verify or change the printing size? Nothing could be simpler.
Click the “Print” button once your lease is signed by all parties if it is an electronic lease. If you have chosen the paper signature method, you can directly print a version as soon as the lease is generated.
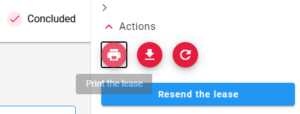
Once you have clicked on the “Print” button, you will be able to choose the format you want and many other settings.
We would like to remind you that the official lease format is the legal format (8½ x 14).
On Apple devices (Mac, Ipad and Iphone), when you click “Print”, it will download a copy of the lease. Go to the folder where you downloaded it and print it in the desired format.
Before printing, consider looking at the preview to get an idea of the result.
Tenants
At all times, the tenant must contact the landlord(s) for any questions regarding a rental or lease application.
You are moving and you still have a ton of things to think about?
We offer you a 100% free application that allows you to have checklist for your move but also to save you dozens of hours of paperwork.
Also:
- Organize your move
- Save time and delegate the paperwork
- Save money with packages that fit your needs
- Be guided through the entire process
How does it work?
Move with ease with the most used moving platform in the country.
1- Order your boxes: Receive your boxes at home and avoid a return trip to the store. Free shipping on orders over $59.
2- Book movers: Find trusted movers in your area, get quotes and book your team in a few clicks.
3- Install an Internet, TV and phone service: Discover the best promotions of the moment according to your new address. Select a package that suits you, or advise your current provider.
4- Get home insurance: Find the right coverage for your new living situation, or simply notify your current insurer of your move.
5- Notify Hydro-Québec: Save $25 by changing your address with Hydro-Québec.
6- Make all your address changes in 5 minutes: Report your change of address to the government, your financial institution, your rewards programs, your cell phone company and more, in one place.